Some things in motorsport are intuitive. Other things not so much. Backsiding cones, for me anyway, was in the latter category.
If you watch a lot of Formula 1, or spent formative hours with Gran Turismo, you built a mental model of how fast cars corner. The racing line -- or raceline -- is the theoretical fastest path through a corner, and the core idea is simple: make the curve as straight as possible. You enter from the outside of the track, hit the apex on the middle of the inside, and exit back toward the outside.
That framework isn't wrong -- it's just incomplete, and autocross and rallycross will expose the gaps in it pretty quickly. If you approach a cone on one of these courses and treat it like the ideal place to apex the turn, it often won't be the fastest line. That's where backsiding comes in.
What It Actually Means
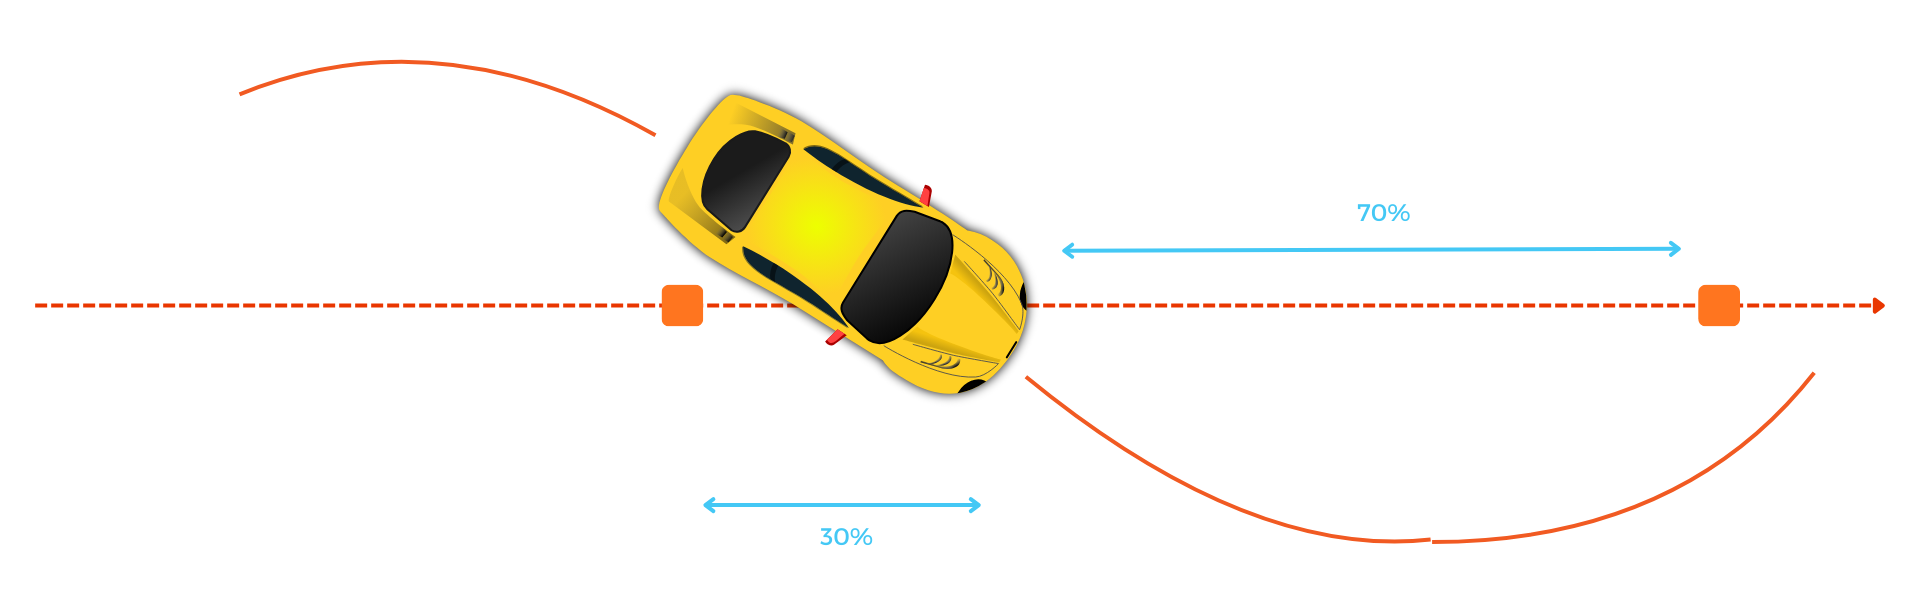
Here's the clearest way I've found to think about it. Imagine a straight line running down the track as the point of reference for your car's angle on the course. The orange squares represent cones on the course.
For a beginner, the tendency is to think of a cone as the apex of a turn, and to pass by it so that the middle of the car passes the cone when the car is parallel to the imaginary reference line connecting the two cones.
In this idealized scenario, as the car turns right it will cross the reference line mid-way between the two cones. As it crosses the line the car's balance will be midway between shifting from the left side to the right side as it begins to turn left.
Backsiding the first cone looks more like this: instead of the first cone being the apex of the turn, the driver has started the turn earlier and apexed before reaching the cone. The car passes the center reference line closer to the cone, so that it is midway across just 30 percent of the way between the cones.
It's called backsiding because the middle of the car is passing by the backside of the cone, instead of the side of the cone. Also, one way to visualize this when driving is that your back quarterpanel will pass close to the cone.
The mental trick here is to think of the cones as defining a curvy road, but that the road is shifted towards the direction of approach. In essence, you are driving the same shaped path, just in different relation to the cones.
Why It Makes You Faster
So why is backsiding cones faster? There are a few reasons.
Reaction Time and Margin of Error
First, it gives you more time to prepare for the next element that's coming. When you backside the cone, you are passing the cone as you are finishing your turn -- the time when the car is traveling straight and is balanced. This gives you more time to process and drive the car into the ideal line for the next element.
This benefit of backsiding can be particularly important in rallycross, where the course is constantly changing and the car's handling on loose surfaces less predictable. Stage rally and rallycross drivers tend to late apex turns for just this reason, as it gives you a greater margin for error in unpredictable circumstances.
If you were doing the standard raceline around a cone and your car got squirrely halfway between the cones, you have less time to react. If you'd backsided the cone, there's more time to get the car back under control before the next element.
The corollary to having more margin of error is that you can be more aggressive. If the car breaks loose because you are pushing it harder, you have more time to get back on track.
Maximizing Straightaway Speed
Another important reason for backsiding cones relates to the old racing adage of "slow in, fast out," which refers to prioritizing speed on the exit of a turn over speed on the entrance of the turn.
The idea is to line yourself perfectly so that you can maximize speed on the exit of a turn and into a straightaway, which will lead to a better overall lap time. Put another way, going fast on the straights is more important than going fast in turns.
Backsiding the cones in a long slalom pattern might not save you time in the slalom itself, but on the last cone you will straighten out sooner. This allows you more space to reach higher speeds between that last slalom cone and the next element.
Learning the Basics
Now that you understand the basic theory behind backsiding cones, you'll need to put it into practice. A good first step is to find a place to try doing it very slowly. For instance, I have gone to a community college parking lot when it's empty on the weekend and set up some cones in a slalom and drive through them slowly.
The first thing you'll notice is that you have to start the pattern before the first cone. You need to approach the cone at a somewhat wider trajectory so you have time to finish the arc of the turn just as you pass the cone. Learning how wide to go at the start of a slalom and other patterns is part of perfecting your technique.
As you pass the backside of the cone with your back quarterpanel, the car is in the neutral transition point between left and right turns, or vice versa. This is the time when, if you need more speed, you are accelerating or finishing accelerating.
After you have passed the cone, you will begin your turn to set up for the next cone -- earlier than you would if you were doing a standard apex line. This is where steering and load transfer come into play. When you are driving this practice line slowly, you can focus on just steering, but as you get faster, you'll need to use load transfer (lifting off the gas and/or braking to shift weight forward) to initiate the turn.
Once you've reached the apex of the turn, you can begin to accelerate out of the turn and past the next cone that you are backsiding, assuming you need to add speed.
Timing, Inputs, and Where to Look
One of the most important things to remember is to keep your head up and look forward, not at the cone right in front of you. This is true for all driving, but particularly when driving in a tight course, as you need to be looking forward to be able to react quickly and apply inputs early.
The slalom pattern for backsiding cones is to swing a bit wide before the first cone, then turn in, brake and hold, let off the brake and accelerate as needed. Then repeat for the next turn.
One thing to point out here: you aren't necessarily braking to slow the car. The brake and hold, in this idealized scenario, is to transfer weight forward to help the car turn. If you need to slow down, you can do that as well. But don't get confused between slowing down and changing the car's balance.
This pattern of turn, brake, accelerate -- and the perfect timing and application of each -- is vexing to master, but in my experience is critical to learning to race.
Practice, Practice, Practice
Backsiding cones is a deep topic. Do it by driving slowly in a parking lot first, then spending a rallycross day focusing just on backsiding cones and the input pattern noted above.
Backsiding cones is related to the topic of late apexing, which is particularly important in rally driving. One thing to note is that backsiding cones is related to the topic of late apexing, which is particularly important in rally driving.
Your new mantra: "attack the back!"